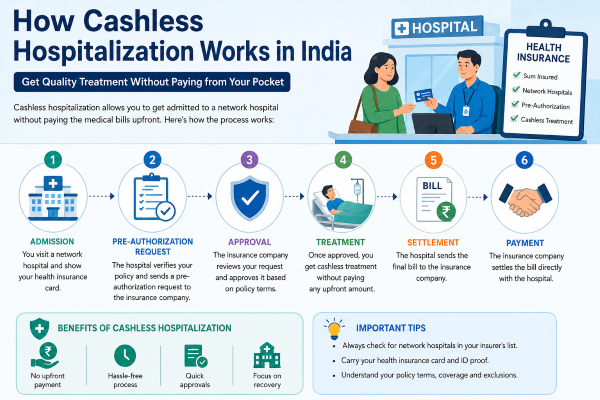
Getting admitted to a hospital is stressful enough without having to worry about arranging lakhs of rupees at short notice. This is exactly the problem that cashless hospitalization was designed to solve. If you hold a health insurance policy in India, chances are you’ve heard the term “cashless treatment” thrown around in advertisements, policy brochures, and agent pitches. But how does it actually work behind the scenes? What happens between the moment you walk into a hospital and the moment your bill is settled without you paying a rupee out of pocket?
This guide breaks down the entire cashless hospitalization process in India — step by step, in plain language — so that when you or a family member actually need it, you know exactly what to expect.
What Is Cashless Hospitalization?

Cashless hospitalization is a facility offered by health insurance companies where the policyholder does not need to pay for hospital treatment upfront. Instead, the insurer (or a Third-Party Administrator acting on its behalf) settles the eligible hospital bill directly with the hospital, provided the treatment is taken at a hospital that is part of the insurer’s “network.”
In simple terms: you get treated, the hospital sends the bill to the insurer, and the insurer pays the hospital directly — minus any non-payable items, deductibles, or co-payment amounts as per your policy terms.
This is different from a reimbursement claim, where you pay the hospital bill yourself first and then submit documents to the insurer to get the money back later. Cashless hospitalization removes that financial burden at the most vulnerable moment — during a medical emergency or planned surgery.
Why Cashless Hospitalization Matters in India
India’s healthcare costs have risen sharply over the last decade, and even a moderately serious hospitalization — say, for a cardiac procedure, an accident, or a complex surgery — can run into several lakhs of rupees. Very few families keep that kind of liquid cash on hand.
Cashless hospitalization matters because it:
- Removes the need to liquidate savings, borrow money, or sell assets during an emergency
- Speeds up hospital admission, since payment isn’t a bottleneck
- Reduces the paperwork burden during an already stressful time
- Gives policyholders access to better-quality care at network hospitals without worrying about affordability upfront
- Builds trust in health insurance as a genuine safety net, not just a tax-saving instrument
Given India’s out-of-pocket healthcare expenditure remains among the highest in the world relative to other countries, cashless hospitalization is one of the most meaningful benefits a health insurance policy can offer.
The Key Players in the Cashless Hospitalization Ecosystem
Before diving into the process, it helps to understand who is involved:
1. The Policyholder (You)
The individual who holds the health insurance policy and is seeking treatment, either for themselves or a dependent covered under the same policy.
2. The Insurance Company (Insurer)
The company that issued the policy and is financially responsible for settling eligible claims — for example, Star Health, HDFC ERGO, ICICI Lombard, Niva Bupa, Care Health, or a public sector insurer like National Insurance or New India Assurance.
3. The Third-Party Administrator (TPA)
Many insurers outsource claims processing to a TPA — a licensed intermediary that handles pre-authorization requests, verifies documents, coordinates with hospitals, and processes claims on the insurer’s behalf. Common TPAs in India include Medi Assist, Paramount TPA, Vidal Health, MD India, and Family Health Plan (FHPL). Some large insurers, however, process claims in-house without a TPA.
Vidal Health, in particular, is one of the more widely used TPAs in the country, processing cashless requests for several public and private insurers. If your health card mentions Vidal Health as your TPA, it means Vidal Health — not your insurer directly — is the entity that will review your pre-authorization request, coordinate with the hospital’s insurance desk, and communicate the approval, query, or rejection status. Policyholders under Vidal Health typically use its dedicated helpline, website, or mobile app to check network hospitals, track claim status, and download e-cards.
4. The Network Hospital
A hospital that has a formal tie-up (empanelment) with the insurer or TPA to provide cashless treatment to the insurer’s policyholders. Only network hospitals can offer the cashless facility; treatment at a non-network hospital typically must be claimed through reimbursement.
5. The Insurance Desk / TPA Desk at the Hospital
Most network hospitals have a dedicated help desk (sometimes called the “Insurance Desk,” “TPA Desk,” or “Mediclaim Desk”) that handles the cashless paperwork on your behalf, in coordination with the insurer or TPA.
Understanding these five players helps make sense of the workflow that follows.
Types of Cashless Hospitalization
Cashless hospitalization broadly falls into two categories, and the process differs slightly for each.
Planned (Elective) Hospitalization
This includes scheduled surgeries, planned procedures, maternity admissions, or any hospitalization that is known in advance — for example, a knee replacement surgery or a scheduled angioplasty.
Emergency Hospitalization
This includes accidents, sudden cardiac events, strokes, or any situation requiring immediate admission without prior planning.
The core cashless mechanism is the same in both cases, but the timelines differ significantly, which we’ll explore below.
Step-by-Step: How Cashless Hospitalization Works
Step 1: Choose or Confirm a Network Hospital
Cashless treatment is only available at hospitals empanelled with your insurer or its TPA. Most insurers maintain an updated list of network hospitals on their website and mobile app, searchable by city, pin code, or hospital name. It’s worth checking this list periodically, since network hospitals can change — a hospital that was on the network list last year may have been removed, or a new one added.
If you’re planning a surgery, it’s wise to confirm with both the hospital’s insurance desk and the insurer’s helpline that the empanelment is currently active before you proceed.
Step 2: Show Your Health Card and ID at the Hospital
When you arrive at the hospital — whether for a planned admission or an emergency — you present your health insurance card (physical or digital, via the insurer’s app) along with a government-issued photo ID (Aadhaar, PAN, or similar) at the hospital’s insurance/TPA desk.
The hospital staff will verify your policy details, including your policy number, sum insured, and whether you (or the patient, if different) are a listed beneficiary.
Step 3: Hospital Initiates Pre-Authorization Request
This is the heart of the cashless process. The hospital’s insurance desk fills out a Pre-Authorization Form (often called the “cashless request form”) with details such as:
- Patient’s name, age, and policy details
- Provisional diagnosis
- Proposed line of treatment or surgery
- Estimated cost of hospitalization
- Expected duration of stay
- Doctor’s notes and relevant medical history
This form, along with initial medical reports (if available), is submitted electronically to the insurer or TPA through a dedicated cashless portal.
Step 4: Insurer or TPA Reviews the Request
Once the pre-authorization request is received, a medical team at the insurer or TPA’s end — such as Vidal Health, if that’s the TPA assigned to your policy — reviews it against your policy’s terms and conditions. They check:
- Whether the condition/procedure is covered under your policy
- Whether any waiting period applies (for example, a 2–4 year waiting period on specific illnesses, or a 30-day initial waiting period for a new policy)
- In case the diagnosis falls under any policy exclusion
- Whether the estimated cost seems reasonable and aligned with standard treatment costs
- Your policy’s sub-limits, room rent capping, co-payment clause, and remaining sum insured for the year
Step 5: Approval, Query, or Rejection
Based on this review, one of three things happens:
Approval: The insurer issues an authorization letter to the hospital confirming the approved amount (which may be the full estimated amount or a partial amount, depending on policy terms). This is usually communicated within a few hours for straightforward cases.
Query: If the insurer needs more information — additional test reports, clarification on diagnosis, or clearer documentation — they raise a query with the hospital. The hospital then needs to respond with the requested details before a final decision is made. This can add several hours to a day or more to the process.
Rejection: If the treatment isn’t covered, falls under an exclusion, or the policy has lapsed, the request is denied. The hospital and patient are informed, and in such cases, the patient typically has to pay for treatment out of pocket and can later attempt a reimbursement claim (which may also be rejected for the same reason) or contest the decision.
For planned hospitalization, it’s advisable to initiate this pre-authorization process at least 3–5 days before the scheduled admission date, since insurers typically require this lead time to review non-emergency cases properly.
For emergency hospitalization, most insurers commit to responding within 1 to 6 hours of receiving a complete request, precisely because timing is critical. Hospitals usually admit emergency patients immediately and run the cashless approval process in parallel, so treatment isn’t delayed while waiting for paperwork.
Step 6: Treatment Proceeds
Once initial approval is granted, the patient is admitted (or continues treatment, in the case of an emergency) without having to pay the hospital directly for covered expenses. The hospital proceeds with the treatment plan as advised by the treating doctor.
Step 7: Enhancement Requests (If Costs Increase)
Sometimes, the actual treatment costs more than the initially approved amount — perhaps due to complications, an extended stay, or additional procedures. In such cases, the hospital sends an enhancement request to the insurer with updated medical justification, asking for additional authorization. This is a routine part of the process and doesn’t necessarily indicate a problem with the claim.
Step 8: Discharge and Final Bill Submission
When the patient is ready to be discharged, the hospital prepares the final bill, itemizing all charges — room rent, doctor’s fees, medicines, consumables, diagnostic tests, surgery charges, and so on. This final bill, along with discharge summary and supporting documents, is sent to the insurer for final approval.
Step 9: Final Settlement
The insurer reviews the final bill against the approved amount and policy terms. Certain items are often excluded from cashless settlement even in a covered claim — these are called “non-payable” or “non-medical” items and can include things like:
- Registration or admission fees
- Telephone and TV charges
- Attendant/companion charges (unless specified in policy)
- Certain toiletries and disposable items
- Administrative charges
The insurer settles the payable portion directly with the hospital. If there’s a co-payment clause, deductible, or amount exceeding the sum insured, the patient is required to pay that portion directly to the hospital at the time of discharge.
Once this is settled, the patient can walk out of the hospital without having arranged a lump sum payment for the covered expenses.
Documents Typically Required for Cashless Hospitalization
While hospitals with dedicated insurance desks handle most of the paperwork, it helps to keep the following ready:
- Original and photocopy of the health insurance card
- Government-issued photo ID proof (Aadhaar card, PAN card, passport, driving license)
- Policy number and details of the insurer/TPA
- Doctor’s prescription or admission advice
- Previous medical records, if relevant to the current condition
- Duly filled pre-authorization form (usually completed with hospital staff assistance)
- KYC documents, in some cases, especially for high-value claims
For emergency cases, the process is more relaxed initially — hospitals will begin treatment first and complete documentation formalities as the patient stabilizes.
Cashless Hospitalization: Emergency vs. Planned — A Quick Comparison
| Aspect | Planned Hospitalization | Emergency Hospitalization |
|---|---|---|
| When to initiate pre-auth | 3–5 days in advance | Immediately upon admission |
| Treatment start | After approval, ideally | Starts immediately; approval runs parallel |
| Approval time | Few hours to 1–2 days | Typically 1–6 hours |
| Documentation | Complete and detailed | Initial minimal, completed progressively |
| Risk of rejection | Lower, if checked in advance | Slightly higher if diagnosis is unclear initially |
Common Reasons Cashless Claims Get Rejected or Delayed
Understanding why claims run into trouble can help you avoid unnecessary complications:
1. Non-network hospital: If the hospital isn’t empanelled with your insurer, cashless treatment simply isn’t available there, regardless of how good your policy is.
2. Waiting period not completed: Most policies have an initial waiting period (commonly 30 days) during which most illnesses (except accidents) aren’t covered. Specific conditions like hernia, cataracts, or joint replacements often carry a separate 1–4 year waiting period.
3. Pre-existing disease non-disclosure: If a condition existed before the policy was purchased and wasn’t declared, the insurer may reject the claim citing non-disclosure, even if the policy’s pre-existing disease waiting period has technically passed.
4. Policy lapsed: If premiums haven’t been paid and the policy has lapsed, cashless facility (and often even reimbursement) is unavailable.
5. Sub-limits and capping: Some policies cap room rent (e.g., “1% of sum insured per day”) or specific procedures (like cataract surgery) at a fixed amount. If the treatment cost exceeds this, the difference is billed to the patient, sometimes on a proportionate basis across the entire bill — this is called “proportionate deduction” or the “room rent clause.”
6. Incomplete or inconsistent documentation: Mismatches between the diagnosis, treatment plan, and cost estimate can trigger queries and delays.
7. Treatment falls under exclusion: Certain treatments — cosmetic surgery, dental treatment (unless due to accident), and some others — are commonly excluded unless specifically added as a rider.
8. Insufficient sum insured: If you’ve already used up a significant portion of your annual sum insured through earlier claims in the same policy year, the remaining balance may not be enough to cover the new treatment.
Tips to Ensure a Smooth Cashless Hospitalization Experience
- Keep your health card and policy document accessible: A digital copy stored on your phone or in the insurer’s app is useful, especially during emergencies when you may not have physical documents on hand.
- Know your network hospitals in advance: Identify 2–3 network hospitals near your home and workplace so you’re not scrambling to find one during an emergency. If your policy is administered by a TPA such as Vidal Health, use their official website or app to search the network hospital list, since it may differ slightly from the insurer’s general list.
- Read your policy wording, especially the exclusions and sub-limits: Many disputes arise simply because policyholders weren’t aware of a room rent cap or a specific exclusion.
- Inform the insurer promptly: Most policies require intimation within a certain window (often 24–48 hours for emergencies, and a few days in advance for planned procedures). Delayed intimation can complicate the claim.
- Disclose pre-existing conditions honestly at the time of buying the policy: Non-disclosure is one of the most common reasons for claim rejection, and it’s entirely avoidable.
- Keep the sum insured in mind: If you’ve had prior hospitalizations in the same policy year, check your remaining balance before a planned procedure.
- Ask the hospital’s insurance desk for updates: They deal with these cases daily and can usually tell you the real-time status of your pre-authorization request.
- Don’t hesitate to ask for a detailed bill breakdown: Understanding what’s covered and what isn’t helps you avoid surprises at discharge.
Cashless Hospitalization Under Government Health Schemes
It’s worth noting that cashless hospitalization isn’t limited to private health insurance. India also has government-backed schemes offering cashless treatment:
- Ayushman Bharat – Pradhan Mantri Jan Arogya Yojana (PM-JAY) provides cashless hospitalization coverage up to ₹5 lakh per family per year for economically vulnerable families, at empanelled government and private hospitals across the country.
- Central Government Health Scheme (CGHS) offers cashless treatment to central government employees and pensioners at CGHS-empanelled hospitals.
- State-specific schemes, such as Maharashtra’s Mahatma Jyotiba Phule Jan Arogya Yojana or Tamil Nadu’s Chief Minister’s Comprehensive Health Insurance Scheme, function on a similar cashless principle for eligible state residents.
While the underlying mechanics — network hospitals, pre-authorization, and direct settlement — are broadly similar to private insurance, eligibility criteria, covered treatments, and empanelled hospital lists differ from scheme to scheme.
Cashless vs. Reimbursement: Which Should You Prefer?
Whenever possible, cashless hospitalization is the more convenient option, since it avoids the need to pay large sums upfront and then wait for reimbursement — a process that can take weeks. However, reimbursement remains a necessary fallback when:
- The treatment is taken at a non-network hospital
- Cashless pre-authorization is rejected but the claim is otherwise valid
- It’s a genuine emergency where the nearest hospital isn’t in the network
In such cases, you pay the bill yourself and later submit the original bills, discharge summary, prescriptions, and payment receipts to the insurer for reimbursement. This process, governed by the Insurance Regulatory and Development Authority of India (IRDAI), typically requires the insurer to settle or reject a reimbursement claim within a specified timeframe after receiving complete documentation.
The Role of IRDAI in Standardizing Cashless Claims
The Insurance Regulatory and Development Authority of India (IRDAI) has, over the years, pushed for standardization and faster processing of cashless claims across the industry. Some notable regulatory efforts include:
- Mandating that insurers decide on cashless requests within a defined time window (historically pushed toward 1 hour for initial authorization and 3 hours for final discharge authorization, in later regulatory guidance)
- Requiring insurers to maintain updated network hospital lists
- Standardizing the list of “non-payable items” to reduce disputes over hospital billing
- Pushing insurers toward digital and interoperable claims processing to reduce paperwork and delays
These efforts have gradually made cashless hospitalization faster and more predictable than it was a decade ago, although experiences can still vary between insurers, TPAs, and individual hospitals.
What Happens If Cashless Is Denied Mid-Treatment?
Occasionally, a cashless request that was initially approved may face issues later — for instance, if the enhancement request for additional costs is denied, or if the insurer disputes part of the final bill. In such situations:
- The hospital will typically inform the patient or family about the discrepancy.
- The patient may need to pay the disputed portion directly to the hospital at discharge.
- The patient can then file a reimbursement claim or a grievance with the insurer for the disputed amount, along with supporting medical justification.
- If unresolved, the policyholder can escalate the matter to the insurer’s grievance redressal officer, and subsequently to the Insurance Ombudsman if necessary.
Keeping calm and asking the hospital’s insurance desk to intervene on your behalf (since they interact with insurers daily) often resolves such issues faster than trying to negotiate directly and single-handedly with the insurer’s call center.
Frequently Overlooked Details That Affect Cashless Claims
- Room category matters: Many policies link the entire claim’s payable percentage to the room category you choose. Opting for a room above your entitled category (say, a private deluxe room when your policy entitles you to a shared room) can lead to proportionate deductions across your entire bill, not just the room rent difference.
- Day-care procedures are increasingly covered: Many modern policies now cover day-care procedures — treatments that don’t require a 24-hour hospital stay, like cataract surgery or certain endoscopies — under the cashless facility as well, so it’s worth checking if your procedure qualifies even without an overnight stay.
- Family floater policies pool the sum insured: If you’re on a family floater plan, remember that the sum insured is shared across all members. A large claim by one family member can reduce what’s available for others in the same policy year.
- Port your policy carefully, if you do: If you switch insurers (portability), your waiting periods for pre-existing diseases are generally carried forward under IRDAI portability guidelines, but it’s important to confirm this in writing with the new insurer to avoid disputes during a future cashless claim.
Conclusion
Cashless hospitalization has fundamentally changed how Indian families experience medical emergencies and planned treatments. Instead of scrambling to arrange funds at the hospital counter, policyholders can focus on what matters most — getting the right treatment — while the insurer and hospital handle the financial settlement in the background.
That said, cashless hospitalization isn’t automatic or unconditional. It depends on choosing a network hospital, understanding your policy’s fine print, disclosing information honestly, and following the pre-authorization process correctly. A little preparation — knowing your nearby network hospitals, keeping your health card handy, and understanding your policy’s exclusions and sub-limits — goes a long way in ensuring the process works smoothly when you need it most.
As India’s health insurance industry continues to mature under IRDAI’s push for standardization, cashless hospitalization is only expected to become faster, more transparent, and more widely accessible — making quality healthcare a little less financially frightening for millions of families across the country.